Manual
•January, 2022
Internal invoice
Explanation of what internal invoices are used for, and how to use the information you get from them.

Explanation of internal invoice format
Internal invoices are weekly reports of which tools have been out of stock (at a person's or deployed). The rental value is automatically calculated and rounded up to the nearest appropriate unit. This is not an invoice that you have to pay anywhere. The purpose is to help you invoice further costs with tools, for example when renting. It can also serve as a reminder if expensive tools are left unused on a facility somewhere. Perhaps they can be put to better use elsewhere.
You will receive 1 internal invoice per order number/order mark, with all the tools that have been rented out in one or more periods with that order mark last week. «Rented out» here means periods where the tool was not registered in a warehouse.
In each email you will receive the internal invoice in 3 formats: Directly as message text in the email, as a PDF attachment and as a spreadsheet. Some companies send these emails to a common distribution address that goes to all case managers, and from there it is easy for each individual to pick out the cost of «their» orders.
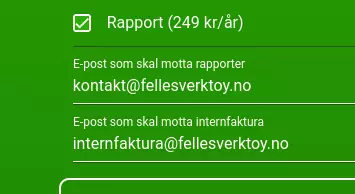
Turn on the Report module, and enter the email(s) in field 2 «Email to receive internal invoice». You can enter multiple emails separated by commas if you want.

Each email has a unique internal invoice number (red squares) that is reflected in the email title and attachment names. The order marking is also found in the email title, in the message body and PDF document, and on each line in the details.
Changes from the previous version
This is the first version, so everything is new. Version 1 has 6 export columns in email and PDF, and 13 export columns in the spreadsheet.
Later versions will have new fields added at the end, the columns will always be in the same order and have identical headings. All event types will retain the same names. This means that newer versions will be backward compatible, and functions written to version 1 will also work with newer versions.
ERRATA/Corrections to this document itself describing version 1:
- None for now.
Sending
Internal invoices are sent for all companies at 08:00 every Monday «Oslo time». If something goes wrong and we need to fix the report function, the next report will include events from the time the previous report was sent. This means that you will usually get weekly reports with what has happened from Monday to Monday 08:00. That's about it. Depending on server load, reporting may go off a little before or after 08:00:00.
The first time you activate the report module, you will automatically receive a report from the last 2 weeks. You can contact us if you would like a report from a different time.
Time limit
We cannot deliver logs from before January 1, 1970 00:00:00 UTC nor from the future (should work fine for all our customers). The year 2038 problem has been taken into account. We will have a problem at the turn of the year 9999/10000 CE but will update the app well in advance.
Data sources
Most fields in the log are stored “as they were at the time.” For example, the log shows tool names as they were at the time the event occurred. Therefore, the same tool may be called different things down the log.
Some fields are retrieved at the time of export, and therefore the value may have been different at the time of the event:
- Employee numbers
- Rental price
These are typically fields that are not updated very often, but if you have changed them during the week, the value will be displayed at the time of export (which is almost certainly Monday 08:00).
Some fields are calculated at the time of export, such as date fields, «days/hours/minutes/seconds out», and cost. This could have been done with simple formulas in spreadsheets, but now we've done it for you 🙂
Example file
Here is an example file (spreadsheet / excel) which shows all the event types and some values for each of them. There is also a brief explanation in the file itself, see details below here.
Required settings
For the export to work you must:
- Check «Report» under Company Settings
- fill in «Email to receive internal invoice» under Company Settings
- You can enter multiple email addresses separated by commas if you want to send to more than one person.
Format
The robot sends an email to the address(es) specified in the «Export Email Address» field under Company Settings.
The email has the same list in the message body, in the attached CSV file and attached PDF. There will always be a CSV file and PDF file attached, even if there have been no events since the last time.
CSV file format and syntax (completely standard CSV):
- Character set UTF-8
- The field separator is comma ,
- Line separator is LF ( , 0x0a)
- The decimal separator is a period .
- The time zone is Europe/Oslo and takes summer/winter time into account. Time may go backwards in certain places in the log, specifically around 02:00-03:00 on the last Sunday in March and October, as long as Norway uses daylight saving time. However, the internal timestamp never goes backwards in time, since it uses UTC. Google does not use leap seconds, so times like 23:59:60 should not occur.
- Date format is «YYYY-MM-DD HH:MM:SS» for example «2022-05-17 08:15:01» for May 17, 2022 at 08:15:01 Oslo time
- Fields containing double English quotes » or commas are formatted like this (completely standard CSV):
- 1 «The field is surrounded by double English quotes»
- 2 Any ” in the text will become ”” in the CSV file.
Example: text “in quotes, double”, and separated by comma becomes «text ““in quotes, double””, and separated by comma»
- Line 1 is headings
- Line 2 and below have event types or possibly error messages. If there have been no events, you will only get the headers, but you will always get an email with an attached spreadsheet.
Time outside/inside
The time is counted from when a tool is taken out of some warehouse, and ends when it is put back into a warehouse. If the tool was taken out several weeks ago, the «time out» will typically be 7 days on each weekly report, until the tool is registered back into a warehouse.
Opening
CSV files are just plain text, and you can open them with a spreadsheet, for example.
How to import reports into spreadsheets
If you use Libreoffice, Openoffice, Google Sheets or Numbers, you can simply open the CSV file and select UTF-8, comma separated.
Excel is a little different, because it doesn't ask for filter settings when you open CSV, for some reason.
So to open the CSV file in Excel you need to:
- Open a new spreadsheet
- Go to Data → Get External Data → From Text
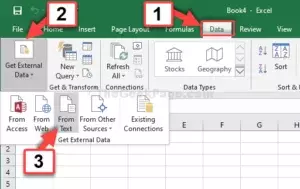
- Select the CSV file
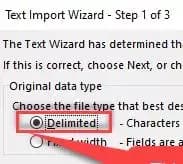
- Select encoding UTF8
- Select separated with characters (not fixed length)
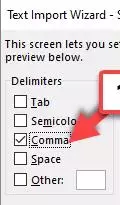
- Select Comma as the only field separator (and '' for text; it is usually set there by default)
- Press Next / Done a couple of times
Now you can do regular spreadsheet things with the information
← Back to all manuals
Last updated: January 12, 2022

